


Now that you’ve done some exploring around this website and understand how this program will work, it’s time to setup your very own personal blog and begin recording your discoveries and thoughts about how Web 2.0 tools can be used for educational purposes.
Why use a blog? This is program is designed to facilitate your play with Web 2.0 tools, but it is also designed to make you think about how these tools can be used with our students. In his book Blogs, Wikis, Podcasts and Other Powerful Web Tools for Classrooms, Will Richardson writes:
...what really distinguishes a blog from your run-of-the-mill Website is much more than process; it's what you'll find there. Weblogs are not built on static chunks of content. Instead, they are comprised of reflections and conversations that in many cases are updated every day (if not three or four times a day). Blogs engage readers with ideas and questions and links. They ask readers to think and to respond. They demand interaction.We're using blogs in this program because of this interactivity. The blog you are about to create will be a place where you can write reflections on the tools you are playing with and the experience you are having. Other participants in the program can read your postings and you can read theirs. We hope to have lots of commenting and sharing going back and forth across blogs during this program. The more you share with each other, the richer the learning experience will be. And don't forget that your blog is out there live in the "blogosphere." Other people interested in Web 2.0 tools might also read and comment on your posts.
In order to receive staff development credit, you must make a thoughtful, substantive post for each of the 23 Things that we will be exploring. Please label each entry in your blog with the Thing # you are writing about. Each of your posts should provide insights into what you’ve discovered and learned. Feel free to share what worked for you … and what didn’t … what surprised you … what frustrated you … what amazed you.
On to creating the blog...
For this program, you may use any one of several free online blog hosting services including Blogger, Wordpress, Typepad or Edublogs. For this program, we're recommending that you use Blogger, because it is extremely easy to use. (Inside the district, you will probably have to override the filter to access it, but its ease of use outweighs the inconvenience of dealing with the override.)
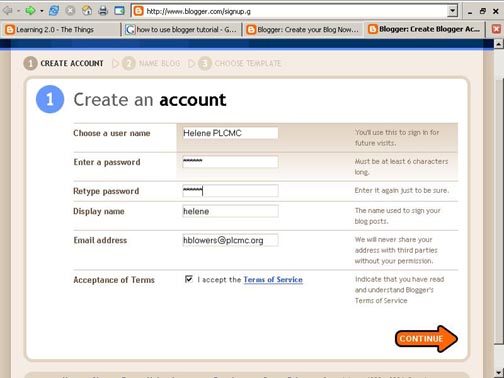
Creating a blog using Blogger takes just three steps:
- Create an account (view screenshot)
- Name your blog (view screenshot)
(2.0Tip: Remember that the whole web world can see your blog title and blog address, so you probably don’t want to use your real name. Consider creating a blog name that’s anonymous, yet uniquely you. The URL for your blog will look something like these examples:
http://coolcatteacher.blogspot.com/
http://preilly.wordpress.com/
http://memw.edublogs.org/
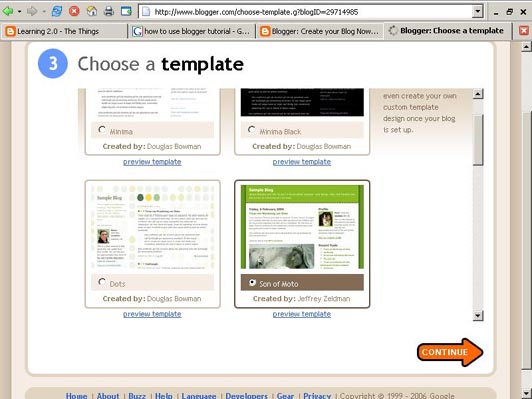
These are real blogs so you can't use any of these! ;-) ) - Select your template (view screenshot).
Blogger has several templates - have fun choosing one for you!
Once you’ve created your blog here are two important things to know:
- To add posts: You will need to sign into Blogger each time you want to add, edit or configure your blog. Be sure to write down your login and password.
(2.0Tip: It's a good idea to get a small notebook in which to write all the usernames and passwords that you will have to create during this program. All of the tools that we will play with will require you to create an account. Unless you can find a way to use the same sign in information over and over, you will want to have a place to keep all this information together.)
- To view your blog: Your blog address is http://(xxxx).blogspot.com, (xxxx)=the unique identifier you entered in Step 2. Be sure to also write down your blog address.
(2.0Tip: This is a good time to "bookmark" your blog for easy access throughout the program.)
Discovery Resources:
If you run into problems or would like more information about blogs and using Blogger here are some discovery resources you can use:
OK -- Now, it’s your turn...
Discovery Exercise:
- Setup a blog for yourself through Blogger.
- Add a post for Thing #1 - Write about what you want to learn by playing with Web 2.0 tools and your experience in setting up the blog. (Remember to include "Thing #1" in the title of the post!)
- Create an avatar for your blog.
An avatar is an online representation of yourself. (You'll notice the avatars for your Learning 2.0 Through Play leaders, Mary and Debbie, are at the top of this post.) Go to http://avatars.yahoo.com/ and design an avatar with a background of your choice. (You will have to set up an account in Yahoo if you don't already have one.) Save your avatar and export to your blog.
[HINT: Here's how to export your avatar to your blog. When you are on your Avatars main page, find the blue rectangle on the right side of the page. One of the options is: "EXPORT: Use your avatar in web pages and blogs and more." Click there. Then, in the Center of the page, 0ne option is your avatar's HTML code. Copy the code, go to the Dashboard of your blog. There are options to add a post OR manage posts, settings, or layout; Click "LAYOUT." You will see various page elements. Paste (Control V) the HTML code in the PAGE ELEMENT marked "HTML/Java Script." Then move that PAGE ELEMENT to wherever you want your avatar to appear on your blog.] - Register your blog here.
IMPORTANT NOTE: How you choose to identity yourself on your blog is up to you. You can blog under a screen name, anonymously, or with your real name. Either way, in order to qualify for staff development credit, you will need to register your blog with MISD Learning Through Play team. Send an email to us with your blog URL. Guest participants (non-MISD staff) are welcome to register with us but will not be eligible for staff development credit or other recognition.
No comments:
Post a Comment